The Dogecoin network is a peer-to-peer payment network consisting of thousands of computers called nodes. Each of these nodes is running specialized software. Dogecoin Core, Dogecoin’s reference implementation, is the software more commonly used to run a Dogecoin node. It can be downloaded from the official Dogecoin.com website and directly from the Github repository.
Running a full node is a service that volunteers in the network, called node operators, provide to the Dogecoin community. Unlike what happens when mining, operating a node does not lead to direct incentives or rewards, but it makes the Dogecoin network more resilient, thus contributing to utility and adoption.
A full node running on a machine with enough disk space and bandwidth will help to:
- Protect against censorship
- Protect against network denial of service (DoS) attacks
- Provide redundancy to the network by providing more bandwidth, which could be critical during spikes in activity
- Establish a baseline for fees and dust limits through setting relay policies (since Dogecoin Core v1.14.4)
You can read more about the Dogecoin blockchain and nodes in these Dogepedia articles:
Since Dogecoin Core 1.14.4, the community has made major efforts to provide a more up-to-date documentation for node operators. The documentation, useful also for advanced users and those planning to build a package for their specific operating system, is included in the Dogecoin Core repository available on Github. You can read it also online here.
Summary
- Minimum Requirements
- Data Directory
- Disclaimer: Security
- Deploying a Node
- Upgrading Dogecoin Core
- Network Configuration
- Advanced Configuration
- Dogecoin CLI
- Help & Support
Minimum Requirements
Running a node is not as complicated as mining Dogecoin, as it does not involve specialized hardware and it does not consume nearly as much electricity. In fact, if you already have a computer turned on 24/24 and an unmetered Internet connection, running a node can be done in the background. The requirements for running a node are:
- Currently, at least 60GB of HD space, possibly on a fast drive, for storing a full copy of the blockchain. You will need more disk space as the blockchain grows, so starting with a larger disk is a good idea.
- 2GB of RAM.
- Unmetered Internet connection or at least an internet connection that allows a significant amount of outbound traffic. On an average month, a popular node can consume up to 1TB of data transfer. This increases significantly during periods of high activity in the network.
- A multi-core CPU is recommended if you plan to work/use the computer while the node is running.
- If you want to provide a valuable service to the network, it is important that the node can stay online for a long period of time - ideally, the node should be running continuously, 24/24.
Many node operators use VPS services for hosting their Dogecoin nodes. Given enough HD space, a modern multi-core CPU, and enough outbound data transfer it is possible to host a website on the same server where a node is running.
Data Directory
The data directory is the location where the blockchain files, alongside log files and wallet files, are stored. You should make sure that this directory is located on a drive with enough disk space. The location of this directory can be changed by using the -datadir= argument when starting your Dogecoin node or using the same setting in the dogecoin.conf file.
This is the default location of the Dogecoin Core Data Directory:
| Platform | Data directory path |
|---|---|
| Linux | $HOME/.dogecoin |
| macOS | $HOME/Library/Application Support/Dogecoin |
| Windows | %APPDATA%\Dogecoin |
Disclaimer: Security
This guide is focused on providing instructions for running a node for supporting the Dogecoin network.
Running a full node can be also useful for businesses or service providers. In these cases, additional precautions might be needed concerning the security of the machine where the node is running. This is not covered in this article and might require an experienced system administrator.
In general, running a node is not inherently different or less safe than running any other peer-to-peer service on your computer, as long as you keep your Dogecoin Core software updated. Anyhow, the node is a public service: unless you are running it behind some proxy system, your IP, and thus your location, will be broadcasted to the outside world. For this reason, it is often recommended NOT to use the node for holding large amounts of Dogecoin (in fact, Dogecoin Core can be used also as a wallet application). For that, it is recommended you rely on a cold wallet solution, such as a hardware wallet.
Deploying a Node
Installing a node is extremely easy - basically, it is just like installing any other application, provided that your machine meets the requirements listed above.
This is the process for all platforms:
- Download Dogecoin Core from the official Dogecoin.com website or from the Dogecoin Github repository. Pick the version for your specific Operating System. At the time of this writing, the Github repository includes builds for Windows, macOS, and Linux machines. Other specialized builds are available and maintained by Dogecoin contributors.
- Install Dogecoin Core as you would install any other application.
- Start Dogecoin Core (Daemon or GUI version).
- Wait for Dogecoin Core to synch with the network: the first time you start Dogecoin Core, this might take more than 24 hours, depending on the conditions of the network and on your internet connection. Patience!
- In most cases, you might need to open up port 22556 in your router/firewall to enable incoming connections.
Building Dogecoin Core From Source
The community provides pre-built packages for the most popular operating systems and distributions, with new ones being added regularly. Anyhow, the official documentation coming with Dogecoin Core includes building instructions for several operating systems, including several Linux distributions, which are helpful for all users that need or want to build Dogecoin Core from source.
Build instructions can be found here.
Windows Instructions
- After you have downloaded the Dogecoin Core version for Windows, go to your Downloads folder and run the installer by double-clicking on the icon.
- Windows will ask you to confirm. Click Yes.
- You might receive a warning from your antivirus software concerning malware contained within Dogecoin Core. As long as you have downloaded it from the official Dogecoin.com website or from the Github repository, there is no risk in installing Dogecoin Core - the warning is a false positive. Whitelist Dogecoin Core in the antivirus control panel, then try installing it again.
- After the installation, Dogecoin Core should be in your Start menu. Click on the icon, and Dogecoin Core will open.
- If everything went fine, Dogecoin Core will start downloading a copy of the blockchain. This might take more than 24 hours - in some cases, days.
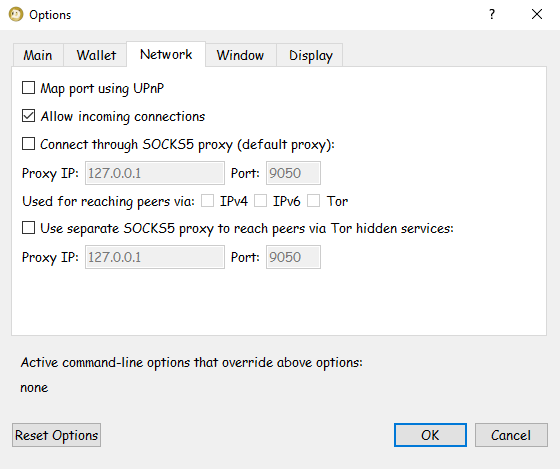
- To support the Dogecoin network, you need to allow incoming connections by opening port 22556 in your firewall and your router. Go to the Network Configuration section for instructions to do so.
After the initial blockchain download is complete and you have enabled incoming connections, Dogecoin Core is ready to operate as a full node in the network. Anyhow, you might still want to change a couple of settings.
- Make sure that incoming connections are enabled in your Dogecoin Core. Go to Settings -> Options. In the Network tab, the “Allow Incoming Connections” option must be checked.
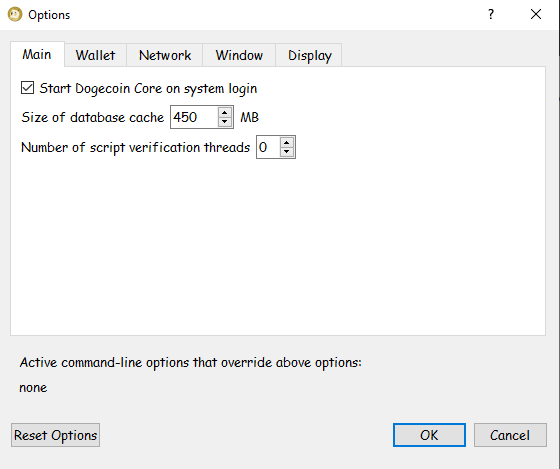
- If you want to let Dogecoin Core start automatically when you start your machine, go to Settings -> Options. In the Main tab, enable the “Start Dogecoin Core on system login” option.
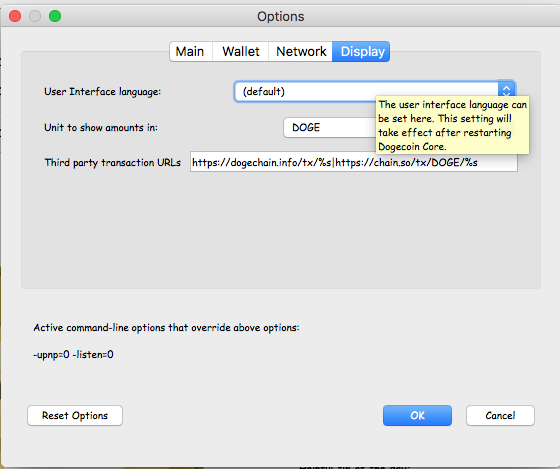
- If you want to change the language of the interface, go to Settings -> Options. In the Display tab, you will be able to switch to one of the languages currently supported by Dogecoin Core.

Additional configuration settings can be found in the Advanced Configuration section.
Dogecoin CLI on Windows
Developers and anybody that does not need to use the GUI (Graphical User Interface) version of Dogecoin can instead use the Dogecoin Core Daemon.
- Open the Start Menu, then type “cmd” and click on the Command Prompt icon
- In the Command Prompt window, type the following command to start the daemon:You will need to adjust the path if you have not installed Dogecoin in the default installation path.
C:\Users\shibetoshi> cd "C:\Program Files\Dogecoin\daemon\" C:\Program Files\Dogecoin\daemon> dogecoind -daemon - The Dogecoin Core Daemon is now starting. You can now access Dogecoin Core’s JSON-RPC interface using the Dogecoin CLI (Command Line Interface), which, in a default Windows installation is available here:
C:\Program Files\Dogecoin\daemon> dogecoin-cli - Use the help command for a list of all available commands:
C:\Program Files\Dogecoin\daemon> dogecoin-cli help - To get help on a specific command:
C:\Program Files\Dogecoin\daemon> dogecoin-cli help getblock
For more information on using Dogecoin CLI refer to the Dogecoin CLI section.
macOS Instructions
- After you have downloaded the Dogecoin Core version for Mac OSX, go to your Downloads folder and double-click the icon.
- You will be shown a window allowing you to drag Dogecoin Core into the Applications folder. Do so to complete the installation.
- Go to your Applications folder and launch Dogecoin Core.
- If everything went fine, Dogecoin Core will start downloading a copy of the blockchain. This might take more than 24 hours - in some cases, days.
- To support the Dogecoin network, you need to allow incoming connections by opening port 22556 in your firewall and your router. Go to the Network Configuration section for instructions to do so.
After the initial blockchain download is complete and you have enabled incoming connections, Dogecoin Core is ready to operate as a full node in the network. Anyhow, you might still want to change a couple of settings.
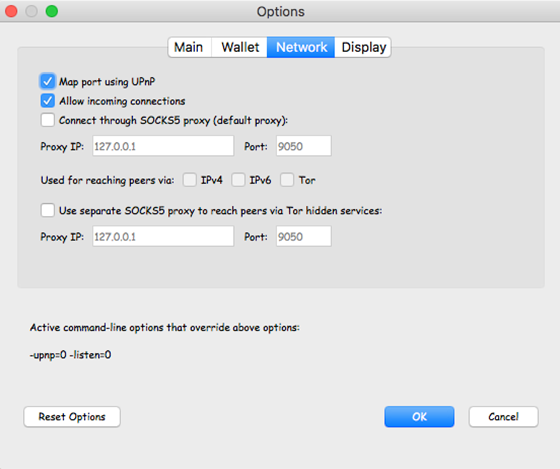
- Make sure that incoming connections are enabled in your Dogecoin Core. Go to Dogecoin Core -> Preferences. In the Network tab, the “Allow Incoming Connections” option must be checked.
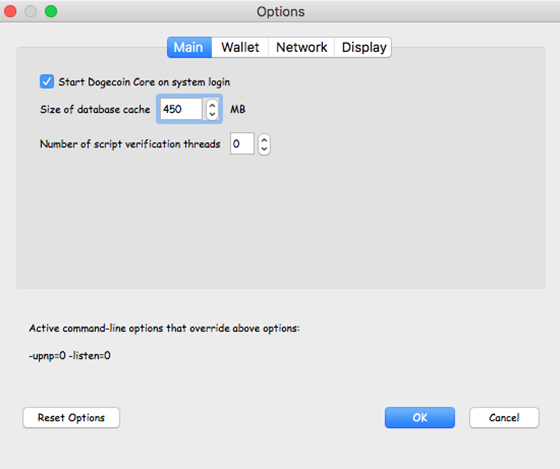
- If you want to let Dogecoin Core start automatically when you start your machine, go to Dogecoin Core -> Preferences. In the Main tab, enable the “Start Dogecoin Core on system login” option.
- If you want to change the language of the interface, go to Dogecoin Core -> Preferences. In the Display tab, you will be able to switch to one of the languages currently supported by Dogecoin Core.
Linux Instructions
Running Dogecoin Core node on a Linux machine is relatively straightforward. VPS plans work very well for running a headless node as they usually come with fast and reliable network connections, but make sure the plan you have selected includes enough data transfer per month and at least 60GB of disk space, as specified in the minimum requirements section. Ideally, you should execute the following commands as a non-root Linux user - refer to your Linux distribution’s manual in case you are not an experienced server administrator.
- Download the latest Linux build from the Dogecoin Github repository:
shibetoshi:~$ wget https://github.com/dogecoin/dogecoin/releases/download/v1.14.6/dogecoin-1.14.6-x86_64-linux-gnu.tar.gz - Untar and unzip the package you just downloaded
shibetoshi:~$ tar -xvzf dogecoin-1.14.6-x86_64-linux-gnu.tar.gz - Enter into the bin directory inside the directory where Dogecoin Core has been untarred:
shibetoshi:~$ cd dogecoin-1.14.6/bin - Start the headless Dogecoin Daemon process:
shibetoshi:~$ dogecoind -daemon - If you prefer and this is not a remote installation, you can instead use the GUI version of Dogecoin Core:
shibetoshi:~$ dogecoin-qt - The Dogecoin Daemon is now starting.
- You can now use the dogecoin-cli tool to interact with Dogecoin Core’s JSON-RPC interface. Use the help command for a list of all available commands.
shibetoshi:~$ dogecoin-cli help - To get help on a specific command:
shibetoshi:~ dogecoin-cli help getblock - You can follow the synching process by reading the contents of the debug.log file contained in the data directory. Go into the data directory, and type the following command:
shibetoshi:~$ tail -f debug.log - In most setups, you can stop “listening” to the output of the debug.log file by pressing CTRL+C
For more information on using Dogecoin CLI refer to the Dogecoin CLI section. Additional configuration settings can be found in the Advanced Configuration section. For example, if you are not using Dogecoin Core as a wallet, it might be a good idea to disable the wallet functionality altogether.
Upgrading Dogecoin Core
Once you have installed and configured it, upgrading from a recent Dogecoin Core release is usually as easy as upgrading any other application.
- If you are using Core as a wallet, make a backup of your wallet files. It is recommend you make also a plain text backup, especially if you are running an older version of Dogecoin Core. Store it somewhere safe - whoever has access to the backups has access to your wallet.
- Shut down your Dogecoin Core. This can be done by either closing the Dogecoin Core GUI application and waiting for it to complete the shutdown process, or, for CLI users, by issuing the dogecoin-cli stop command via shell. More info for CLI users is available here.
- Once done, follow the installation instructions above for your current OS.
Network Configuration
By default, in most setups, your Dogecoin Core node might be able to establish only outbound connections. To support the Dogecoin network, you must allow inbound connections through port 22556.
Depending on your local network setup, this might require extra configuration in your router and/or in your modem, and some extra rules added to your firewall.
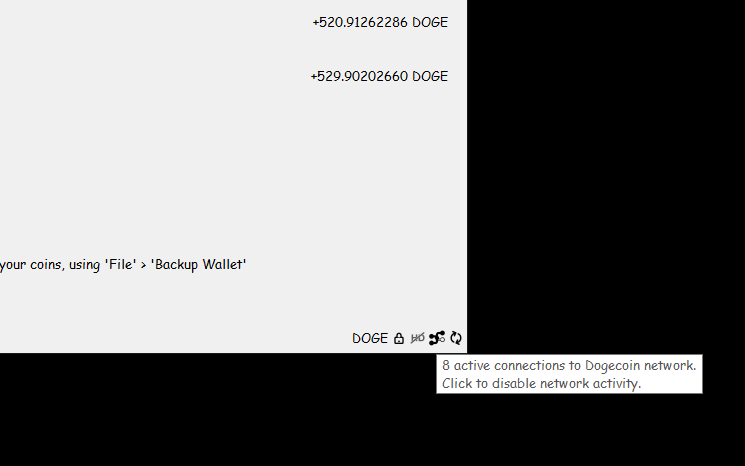
First of all, you will need to check whether incoming connections are working or not. When incoming connections are not enabled, Dogecoin Core will be able to establish only 8 outgoing connections. If the total connection count of your node is above 8, then it means your node is allowing incoming connections.
You can check the number and type of connections very easily using Dogecoin Core GUI. If you look at the bottom right corner of the Dogecoin Core window, you will see an icon representing the current network status. Hover over the icon (do not click) and a popup should appear, displaying the total number of connections.
Otherwise, go into the Help -> Debug menu, and you should see a detailed overview of your network status.
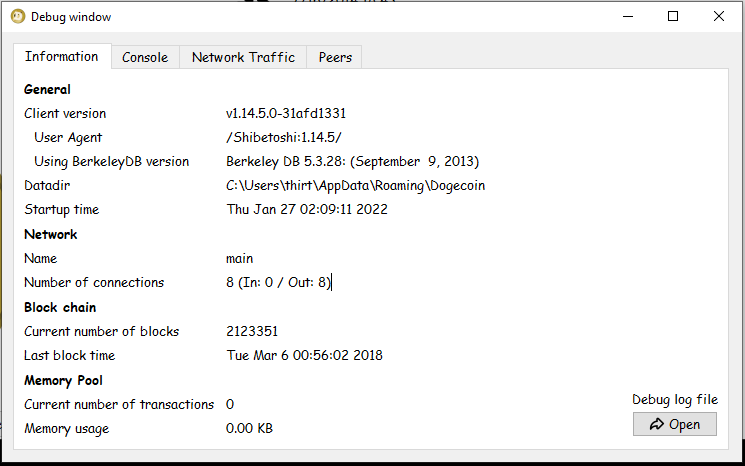
In both these examples, only incoming connections are enabled.
If you are using the Dogecoin CLI, you can check the total number of connections by using the getconnectioncount command:
shibetoshi:~$ dogecoin-cli getconnectioncount
12
In this case, since there are more than 8 active connections, we know that the node is already allowing incoming connections.
Please keep in mind that your node will be able to accept incoming connections only after it has downloaded a full copy of the blockchain. Wait for the sync phase to complete and then wait a few hours before checking whether incoming connections are working.
Forward Port 22556 in your router
This step is usually not necessary if you are running Dogecoin Core in a VPS server, since most services will allow all incoming connections to reach your servers. Anyhow, in some cases, some hosts might indeed have a firewall in front of your server - in which case, you might need to ask their customer support to forward port 22556 for you.
In most homes, computers connect to the Internet through a modem or a router, which is configured to block incoming connections to most ports. To forward port 22556, you will need to follow the following steps. Please refer to your router’s manual for specific instructions.
Access your router’s control panel using your internet browser. Usually, most routers have a control panel accessible at https://192.168.0.1 or at https://192.168.1.1. Sometimes, a sticker is placed on the bottom or the side of the router listing the IP.
Login into the control panel of the router. You will need to use the username and password provided by the router manufacturer. Sometimes, a sticker is placed on the bottom or the side of the router revealing the admin password. These are some common default passwords used by popular router manufacturers:
Manufacturer Username Password D-Link admin (blank) Netgear admin password Linksys admin admin Asus admin admin DrayTek admin admin ZyXel admin 1234 TP-Link admin admin Belkin admin (blank) In the router’s control panel, assign a static IP to the machine running Dogecoin Core. This is normally done in the Dynamic Host Configuration Protocol (DHCP) page.
In the router’s control panel, configure port forwarding, forwarding all inbound traffic to port 22556 from your router to the static IP you assigned to the machine running Dogecoin Core.
Open Port 22556 in your firewall configuration
Finally, in some setups and operating systems, you will also need to open port 22556 in the machine where Dogecoin Core is installed. The instructions to do so vary from operating system to operating system. Some antivirus software might include a firewall - refer to the manual provided by the developer.
- Windows 10 & 11 Instructions
- macOS Instructions (usually unnecessary; the firewall is disabled by default)
- Ubuntu Instructions: UFW Firewall
Advanced Configuration
Dogecoin Core is highly configurable. Configuration settings for the Dogecoin Core Daemon or the Dogecoin Core GUI can be used as an argument when starting Dogecoin Core or can be saved inside the dogecoin.conf file, which should be placed inside the data directory.
To start Dogecoin GUI with custom settings:
dogecoind-qt -maxconnections=50 -datadir=/dogecoin/data
To start the Dogecoin Daemon with custom settings:
dogecoind -maxconnections=50 -datadir=/dogecoin/data -daemon
Otherwise, you can save the configuration settings into the dogecoin.conf file and they will be applied whenever you start Dogecoin Core:
datadir=/dogecoin/data
maxconnections=50
You can get a list of all the available configuration settings using the help command:
shibetoshi:~$ dogecoind -help
The examples directory of the Dogecoin Github Repository includes a dogecoin.conf file with in-depth commentary about the various settings. Check it out here.
Path to dogecoin.conf
You can specify a custom path to dogecoin.conf when starting Dogecoin Core.
For Dogecoin Core GUI:
dogecoind-qt -conf=/cheemz/dogecoin.conf
For the Dogecoin Core Daemon:
dogecoind -conf=/cheemz/dogecoin.conf
Set the Minimum Relay Fee
As a node operator, you can set the minimum relay fee for your node. Transactions with fees below this amount (in DOGE/kB) will not be relayed by your node. Default: 0.001.
minrelaytxfee=<amt>
Set the Maximum Relay Fee
Transactions with a maximum total fee above this amount (in DOGE) will not be relayed. Default: 100.00.
maxtxfee=<amt>
Accept RPC Commands
Enable RPC commands for dogecoind and dogecoin-qt. The interface is exposed on port 25555.
server=1
RPC Username and Password (deprecated)
When interacting with the RPC interface, authentication is required. Dogecoin Core uses a random cookie when no authentication credentials are provided. Users can configure a username and password for access to the RPC interface. Be extremely careful in not exposing a wallet. Anybody with access to the RPC credentials has full access to your wallet. The username and password are not encrypted when connecting to a remote RPC server.
rpcuser=shibetoshi
rpcpassword=impossibletoguesspassword
RPC Auth
Instead of storing the plain password in the configuration file, you can instead store its hash. The client can connect normally using the rpcuser and rpcpassword arguments. The format is:
rpcauth=<USERNAME>:<SALT>$<HASH>
A python script to generate the user login credentials is included in the share/rpcuser directory in the Dogecoin Github repository.
RPC Bind
Bind to a given address to listen for JSON-RPC connections. Be extremely careful in not exposing a wallet. Anybody with access to the RPC credentials has full access to your wallet.
rpcbind=<addr>
RPC Allow IPs
Allow JSON-RPC connections only from the specified ips. Specify multiple times to allow connections from multiple IPs. Be extremely careful in not exposing a wallet. Anybody with access to the RPC credentials has full access to your wallet.
rpcallowip=<addr>
RPC Port
Bind to the given port to listen for JSON-RPC connections (default:25555). Be extremely careful in not exposing a wallet. Anybody with access to the RPC credentials has full access to your wallet.
rpcport=<port>
Custom Data Directory
You can configure a custom location for the data directory.
datadir=/dogecoin/data
Custom Backup Directory (Dogecoin Core versions > 1.14.6)
You can configure a custom location for the directory used to store backups when using the dumpwallet and backupwallet CLI commands.
backupdir=/Users/Cheemz/SecretCannolo/
Disable Wallet Functionality
If you are operating Dogecoin Core to support the network, probably you are not using it also as a Dogecoin wallet. To disable wallet functionality, use the disablewallet setting.
disablewallet=1
Bind to an IP
Bind to the given address and always listen on it.
bind=<ipaddress>
Reduce Traffic and Bandwidth Usage
To reduce bandwidth usage, you can reduce the number of connections and traffic allowed by Dogecoin Core. By default, Dogecoin Core allows up to 125 connections, with 8 connections being outbound.
You can reduce the maximum number of connections using the maxconnection setting. If you have limited bandwidth, start with a lower number of maximum connection and increase it gradually. 50 connections might be a good starting value.
maxconnections=50
You can reduce the maximum amount of bandwidth used to serve historic blocks (the blocks served when a new node is syncing up for the first time). This will drastically reduce bandwidth usage:
maxuploadtarget=<MiB per day>
Personalize Your Node
If you want to add a string of text to the user agent broadcasted by your node, you can use the uacomment setting. If you are operating your node from your own home and you do not want to reveal your identity, it is recommended you do not include identifying information.
uacomment=Cheemz
Dogecoin CLI
The Dogecoin CLI is a tool allowing you to access the JSON-RPC interface provided with Dogecoin Core. It is recommended that you explore the several commands listed when using the help command, where commands will be neatly divided into categories.
The Github repository has a good introduction to using the Dogecoin CLI tool.
shibetoshi:~$ dogecoin-cli help
As of Dogecoin Core 1.14.6, this is the output of the command:
    == Blockchain ==
    getbestblockhash
    getblock "blockhash" ( verbose )
    getblockchaininfo
    getblockcount
    getblockhash height
    getblockheader "hash" ( verbose )
    getchaintips
    getdifficulty
    getmempoolancestors txid (verbose)
    getmempooldescendants txid (verbose)
    getmempoolentry txid
    getmempoolinfo
    getrawmempool ( verbose )
    gettxout "txid" n ( include_mempool )
    gettxoutproof ["txid",...] ( blockhash )
    gettxoutsetinfo
    preciousblock "blockhash"
    pruneblockchain
    verifychain ( checklevel nblocks )
    verifytxoutproof "proof"

    == Control ==
    getinfo
    getmemoryinfo
    help ( "command" )
    stop

    == Generating ==
    generate nblocks ( maxtries auxpow )
    generatetoaddress nblocks address (maxtries auxpow)

    == Mining ==
    createauxblock <address>
    getauxblock (hash auxpow)
    getblocktemplate ( TemplateRequest )
    getmininginfo
    getnetworkhashps ( nblocks height )
    prioritisetransaction <txid> <priority delta> <fee delta>
    submitauxblock <hash> <auxpow>
    submitblock "hexdata" ( "jsonparametersobject" )

    == Network ==
    addnode "node" "add|remove|onetry"
    clearbanned
    disconnectnode "address"
    getaddednodeinfo ( "node" )
    getconnectioncount
    getnettotals
    getnetworkinfo
    getpeerinfo
    listbanned
    ping
    setban "subnet" "add|remove" (bantime) (absolute)
    setmaxconnections
    setnetworkactive true|false

    == Rawtransactions ==
    createrawtransaction [{"txid":"id","vout":n},...] {"address":amount,"data":"hex",...} ( locktime )
    decoderawtransaction "hexstring"
    decodescript "hexstring"
    fundrawtransaction "hexstring" ( options )
    getrawtransaction "txid" ( verbose )
    sendrawtransaction "hexstring" ( allowhighfees )
    signrawtransaction "hexstring" ( [{"txid":"id","vout":n,"scriptPubKey":"hex","redeemScript":"hex"},...] ["privatekey1",...] sighashtype )

    == Util ==
    createmultisig nrequired ["key",...]
    estimatefee nblocks
    estimatepriority nblocks
    estimatesmartfee nblocks
    estimatesmartpriority nblocks
    signmessagewithprivkey "privkey" "message"
    validateaddress "address"
    verifymessage "address" "signature" "message"

    == Wallet ==
    abandontransaction "txid"
    addmultisigaddress nrequired ["key",...] ( "account" )
    addwitnessaddress "address"
    backupwallet "destination"
    bumpfee "txid" ( options )
    dumpprivkey "address"
    dumpwallet "filename"
    getaccount "address"
    getaccountaddress "account"
    getaddressesbyaccount "account"
    getbalance ( "account" minconf include_watchonly )
    getnewaddress ( "account" )
    getrawchangeaddress
    getreceivedbyaccount "account" ( minconf )
    getreceivedbyaddress "address" ( minconf )
    gettransaction "txid" ( include_watchonly )
    getunconfirmedbalance
    getwalletinfo
    importaddress "address" ( "label" rescan p2sh )
    importmulti "requests" "options"
    importprivkey "dogecoinprivkey" ( "label" ) ( rescan )
    importprunedfunds
    importpubkey "pubkey" ( "label" rescan )
    importwallet "filename"
    keypoolrefill ( newsize )
    listaccounts ( minconf include_watchonly)
    listaddressgroupings
    listlockunspent
    listreceivedbyaccount ( minconf include_empty include_watchonly)
    listreceivedbyaddress ( minconf include_empty include_watchonly)
    listsinceblock ( "blockhash" target_confirmations include_watchonly)
    liststucktransactions ( verbose include_watchonly )
    listtransactions ( "account" count skip include_watchonly)
    listunspent ( minconf maxconf  ["addresses",...] [include_unsafe] [query_options])
    lockunspent unlock ([{"txid":"txid","vout":n},...])
    move "fromaccount" "toaccount" amount ( minconf "comment" )
    removeprunedfunds "txid"
    rescan ( "height" )
    sendfrom "fromaccount" "toaddress" amount ( minconf "comment" "comment_to" )
    sendmany "fromaccount" {"address":amount,...} ( minconf "comment" ["address",...] )
    sendtoaddress "address" amount ( "comment" "comment_to" subtractfeefromamount )
    setaccount "address" "account"
    settxfee amount
    signmessage "address" "message"
    walletlock
    walletpassphrase "passphrase" timeout
    walletpassphrasechange "oldpassphrase" "newpassphrase"
You can also get help and information about any command using the help command with the extra argument:
shibetoshi:~$ dogecoin-cli help <command>
Some useful commands are listed below.
Managing your Dogecoin Core daemon
- You can stop your Dogecoin Core daemon cleanly by using the stop command:
shibetoshi:~$ dogecoin-cli stop - Get information about your node:
shibetoshi:~$ dogecoin-cli getinfo - Rescan the blockchain from a specific block (since Dogecoin Core 1.14.6):
This command allows node operators to rescan the chain for wallet transactions from a certain height.
console shibetoshi:~$ dogecoin-cli rescan <block height>
- Get total number of connections:
shibetoshi:~$ dogecoin-cli getconnectioncount - Set maximum number of connections (since Dogecoin Core 1.14.6):
shibetoshi:~$ dogecoin-cli setmaxconnections <desired_amount> - Add a node to the addnode list:
shibetoshi:~$ dogecoin-cli addnode <addr> add - Remove a node from the addnode list:
shibetoshi:~$ dogecoin-cli addnode <addr> add - Disconnect from a node:
shibetoshi:~$ dogecoin-cli disconnectnode <addr> - Get information about the blockchain processing:
shibetoshi:~$ dogecoin-cli getblockchaininfo - Get information about a specific block:
shibetoshi:~$ dogecoin-cli getblock <blockhash> - Get information about a specific transaction:
shibetoshi:~$ dogecoin-cli gettransaction <txid> - List and explore “stuck” transactions (since Dogecoin Core 1.14.6): If you are using your Dogecoin Node to send and receive transactions, it might be useful to identify “stuck” transactions (not mined and not in the mempool) before an upgrade to local fee and dust policies which might allow old forgotten transactions to get “unstuck” due to more permissive policies.
The method can be called with:
shibetoshi:~$ dogecoin-cli liststucktransactions
In general, it is recommend that you explore and “play” with the various available commands; there is no better way to learn. The JSON-RPC interface can be used to develop services and automate the management of your Dogecoin Core node.
Finding Help as a Dogecoin Node Operator
There are several communities where you can find help in setting up and operating your node. On reddit, you can ask questions on r/dogecoin or r/dogeducation. Help can be found also on other social networks - there is an active community of shibes running Dogecoin Nodes.